
While looking for treasure at my local ReStore, I happened upon a stained glass lamp that "needs some love". $19 later, I was heading home with a lamp that most certainly needed some love.
The Lamp
 The lamp had been dropped and was broken in a few places. Fortunately I have a box full of adhesives and at least one of them should do the trick.
Unfortunately, the previous lamp owner tried to fix the lamp, and my first order of business was to remove the packaging tape that was holding the lamp together, as well as remove the bits of adhesive the previous owner had tried to use to fix the lamp. rookie.
Break #1
 Fixing break number 1 was a fairly simple process of bending some metal, applying a healthy dose of J-B Weld, and holding everything in place with some masking tape.
Break #2
 The second broken part of the lamp was a bit more serious. Shattered glass was involved, and lamentably, half of one of the red flower pieces was shattered to such an extent that I didn't want to put all of the pieces back together. It took a while, but eventually all of the pieces were put together with J-B Weld and tape.
Amazingly, I didn't cut myself on any of the broken glass. :)
Just Like My Truck
 Creating a replacement for the missing flower piece was fairly easy. Having recently repaired a broken tail light on my truck, I had some "cut and peel" repair tape sitting around that would be perfect for this lamp.
Good as New!
 After the J-B Weld had cured over night, I removed the masking tape and applied the "cut and peel" tail light repair tape.
Hot damn, that is looking good!
Let There Be Light
 The final test of any lamp is "plug it in". Not only do I have a wonderful stained glass lamp, I can now put "Stained Glass Lamp" on my ever growing list of broken things that I have repaired. Now I just need to actually make a list. :)
In total, it probably took a little under an hour to fix this lamp. Now quite reading, and go fix something.
For the last 2 days, my solar irrigation system has been unable to work due to the lack of sunlight. Because of the high heat, the plants definitely needed some water, and I really didn't feel like lugging buckets of water up a hill. Fortunately, I had some crap in the Wreckroom that could make my job easier.
Easier is good. :)
Basically, I need some 12 volt power to run the pump for an hour or so.
Dark Days

Just over 60 miles south of me, the Butte fire is raging; and 80 miles to the west is the Valley fire. This picture of the Sun was taken around 3PM. California is burning. [hella sadface]
Fix Some Crap
 Oh, some broken battery terminal clips!
Who said being a pack-rat is a bad thing? Wooowee, I sure am glad I didn't throw the broken clip in the trash. A bit of J-B Quick and that broken clip is as good as new.
Add Some Twisty Cap Thingies
 When I set up my solar irrigation system, the panel was attached to the pump with MC4 connectors. As luck would have it, I just happened to have a set of heavy gauge wires with MC4 connectors on one end and bare wire on the other.
A few quick twists (and some gorilla tape) and everything was together and ready to rock.
Give It Some Juice!
 Boring, isn't it? :)
After walking to the irrigation site, the wires were connected to the pump and the clips were attached to my spare motorcycle battery.
Booyah! flowing water.
After everything was running, I cleaned out some clogged emitters and watched as the water soaked into the parched land.
Now quit reading, and go do a rain dance. please.
My soil (if you can call it that), is mostly comprised of clay and rock. While this makes planting trees a rather decent work out, it would be nice if I could easily put stakes in the ground. I have some portable fencing and being able to quickly set up the fencing without too much swearing would be a great thing.
Obviously I need a special tool to make a 'pilot' hole for the temporary fence posts.
Gather Supplies!
 After a slight drizzle of a brainstorm, a plan was hatched and off to the hardware store I went.
Aside from hardware store goods, I needed a handle for my new tool and there was a wonderful branch on my property that would suit my needs perfectly.
Clean it up
 Excess material was removed from both ends of the branch and I was left with about 1.5 meters of awesome wizard staff.
I know what you are thinking, and you are correct: the end of the staff should be made into a slingshot.
Nailed it
 In order to poke a hole in the ground, a nice big shiny nail was selected for the job. The head of the nail was cut off and some shallow grooves were cut into the side of the nail.
Damn that nail was tough, and it got quite hot while cutting it.
Some shitty fraction
 In the bottom of the staff, a hole was drilled that would house the nail. I have no idea what size the hole is, but I can guarantee that the measurement is some shitty fraction.
Have I ever mentioned how much I dislike fractions?
Now where is my 17/29ths inch doohickey?
All together
 The base of the nail was secured in the staff with a hefty bit of J-B Weld. The grooves that were cut into the side of the nail provided plenty of grip for the adhesive.
A 90° angle bracket was bolted to the staff and a block of wood was screwed to the bracket.
Now all I have to do, is position the nail where I want a hole to be, and step on the bracket to drive the nail into the ground! booyah!
They can't all be winners.
 Bummer.
Have I mentioned that my soil is mostly rock and clay? On my first attempt to use my newly crafted tool, the nail hit a rock and bent. fuck. Oh well, Now I get to think of a better solution to the problem, and I can still make a sweet slingshot!
Birds!
 After the failure of my holemaking tool, I sat and watched the birds for a bit. There is something very soothing about watching the birds interact with each other.
Now quit reading, and go make something that doesn't work. :)
Watch your fingers with that.
Last Autumn, I began the process of building a chicken coop and chicken run for about 4 chickens. One of the biggest concerns for me was making sure that the door to the coop is secure at night. There are plenty of expensive automatic coop doors available online, but I was more intent on building my own door because ... uh... well.... I like to build things.
Enough jibber jabber, let's get to it!
The Door
Mounting the motor
 For opening and closing the door, I am using a 12 volt automobile antenna
. My original plan was to make the door open vertically, but after a few tests, I opted for a horizontal sliding door design.
In the vertical orientation, is was common for the door weight to make the gears jump in the motor and then the door would come crashing down. I want a door, not a guillotine!.
Push/Pull Mount for the antenna
 Much like the mounting brackets for the motor itself, the antenna is connected to the door using plumber's tape. Yea, it looks rather janky, but it is solid and it works.
Opened and Closed


On the top left and right of the sliding door, are magnetic switches that are used to register when the door is finished opening or closing.
A bar of soap was rubbed in the channels where the door will slide, in order to make for a smooth operation.
There is a gap in the door track (visible in the bottom left). As the chickens go in and out of the coop, the track will accumulate straw and droppings that may cause problems with closing the door all the way. By leaving a gap in the track, accumulated gunk will get pushed out of the way when the door closes.
Making A Case For The Controller
The coop door is controlled by a BeagleBone Black running Debian Linux.
Gather some supplies

- a ceiling lamp for the recycling center
- some j-b weld
- a beaglebone black
- a DPDT 12 v relay
- a 2 channel relay
controllable via IO pins on the BeagleBone.
- some of those stand-off thingies I like so much
TAKE IT APART!
 Sadly, this is the only part of this build where I get to take something apart.
All of the electronic internals were removed from the lamp.
Weld things in place
 The relays and beaglebone black were mounted to stand-offs and then j-b welded in place.
The hole in the bottom of the lamp base will be used for routing wires and cables.
Route some wires.
 There are 5 wires coming from the coop door that need to be routed into the shed where the controller will be mounted. One wire for each of the magnetic switches, the common ground for the switches, and two wires for the motor.
Mount it!
 Here is the 'lamp' with the cover in place. Originally, I had hoped that I could use a USB WiFi adapter for the BeagleBone to access the network but the distance was too great. Instead, I configured a spare router running DD-WRT to act as a repeater bridge and the BeagleBone was networked to the repeater.
A 12v 6a power adapter was wired to the relays in order to send 12 volts of power to the antenna.
Platform and ramp
 After the door was finished, a platform and ramp to the chicken run was added to the coop.
Now it is time to get some birdies! bok bok bok!
Why did I use GNU Linux when I could have used a microcontroller with a light sensor to control the door?
I used Linux as the basis for my door because I wanted to use skills and tools that I already know, and I like having choice when it comes to programming languages used in my projects... and the light sensor doors are all fine and dandy until those sneaky no-good raccoons get their hands on a flashlight!
Now quit reading, and go make something.
See also: http://www.jezra.net/blog/The_magic_starts_at_330AM_a_coop_story to see how the coop gets open and close times from the interwebs
After re-purposing a larger case with more storage for the server on my home network and filling the server with my ripped DVDs, I figured it was about time to replace my media playback machine with a machine that was actually capable of decoding my rips without running the CPU at 100%.
Gather Some Components
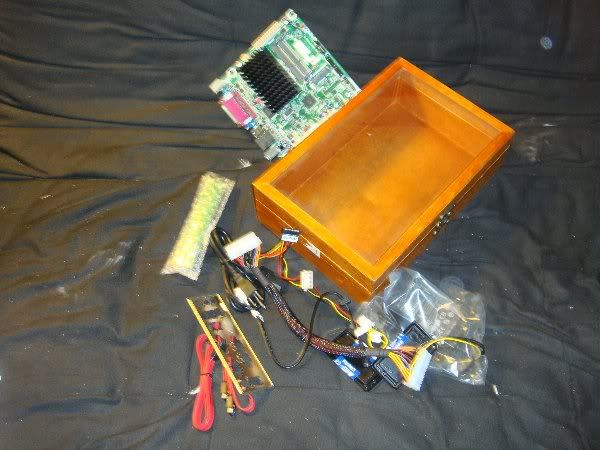 The case for the new machine is box that was part of a Wild Turkey holiday gift set: a cheaply crafted piece of crap made of low grade wood, with a clear plastic cover.
The Electronics
- Dual core 1.8Ghz Atom processor on a mini-itx motherboard
- 2 x 2Gb RAM
- A far too powerful power supply
- 80Gb SATA laptop hard-drive that I pulled out of a busted laptop
Because this machine is going to be fanless, I decided to layout the components in a way that would maximize convection cooling. What this means, is that the component that generates the most heat needs to be closest to the exhaust and the most temperature sensitive component needs to be located by the air intake.
Cutting, Drilling, Bending, JB-Welding
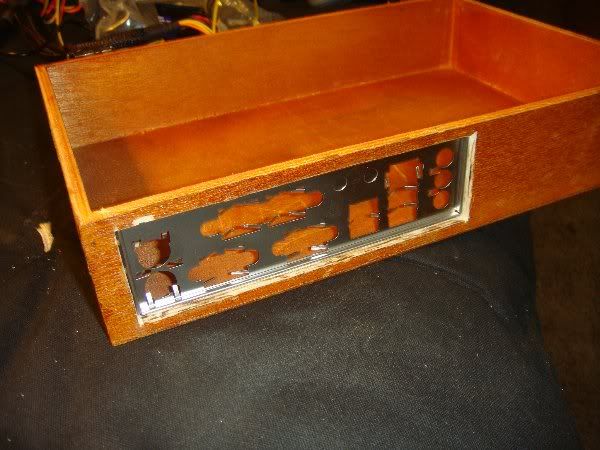

First things first: the hinged lid needed to be removed so I could muck with the inside of the box more easily.
- After aligning all of the internals, I traced where the metal port plate is supposed to go and then cut... not a bad fit.
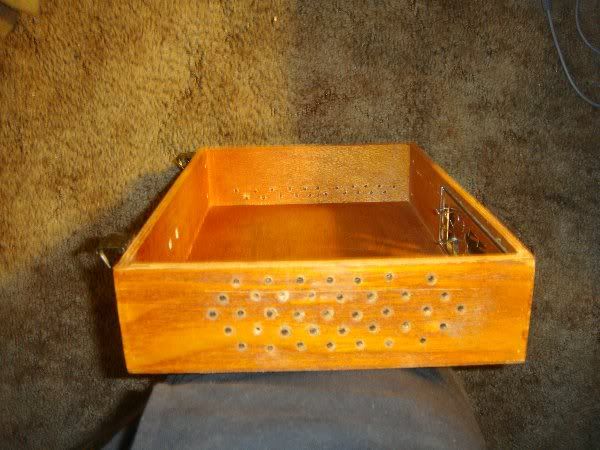
- A lot of small holes where drilled on both sided of the box. Technically, it was the top and bottom that were drilled ( the machine is going to be on end so as to provide the best convection airflow.
- Those metal things with the points are my component stand offs and I bent the points down before using JB-weld to attach them to the inside of the box.
Fire Up the Soldering Iron
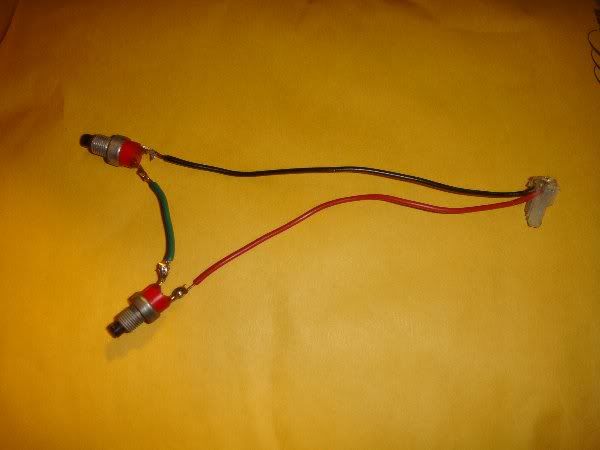
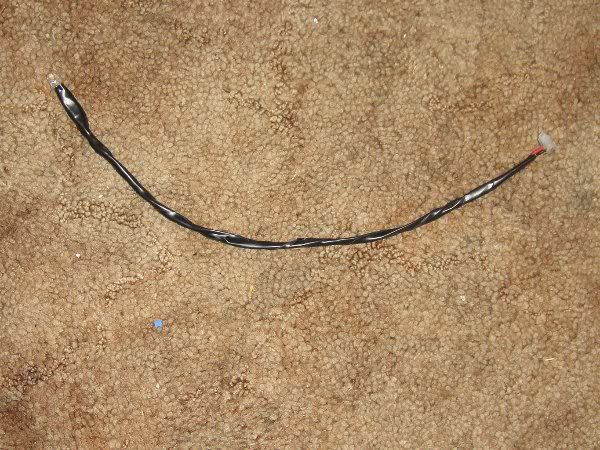
- That two pronged thing-a-ma-bobber is my power switch. Because it consists of two switches in series, both switches must be pressed in order to power the machine on and (most importantly) power off the machine. The last switch I put in/on a machine has a tendency to accidentally get pressed when I least expect it; like when I open my scanner.
- A red LED was soldered to some wire and wrapped with electrical tape. This is the Power On indicator and bit a sandpaper helped diffuse the light coming out of the LED.
Put It All Together
 This is the mostly finished machine with the lid put back on. The locking clasp on the side had to be moved, but it still functions perfectly.
At this point, everything was going extremely well and the computer looked absolutely fantastic, so I figured something was terribly wrong. After connecting everything and pressing the power buttons .... nothing happened. Bummer.
Note to self: when powering up a computer, make sure it is plugged in properly.
After properly plugging in my power converter, the machine booted and I installed Arch Linux.
Installed
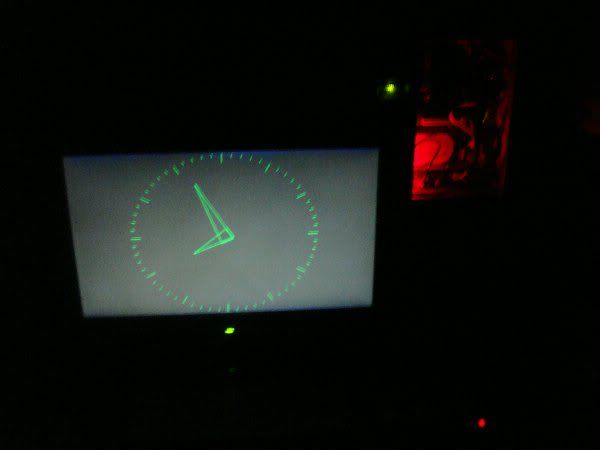
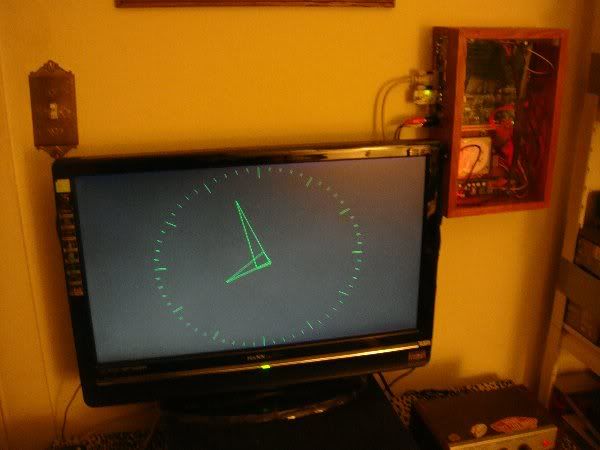

The final resting place for the machine is on the wall next to the TV.
- Don't be afraid of the dark
- Computers are just fancy clocks
- The two power switches are just barely visible on the right side of the machine.
Still to do: The audio out can use a smaller adapter and the current external USB wireless adapter needs to be replaced by an internal PCI-Express mini card. I need to either hack the XMBC to properly handle my NES controller, or I need to write my own software for browsing and playing media from my collection.
Due to the lack of a fan, this computer is silent; therefor, I have named it Wind.
Now quit reading, and think of wind related things.
like:
- What's next? A computer named Earth and a computer named Fire?
- Make 3 more, and Crom will laugh at them.
Also, I'm fairly certain that you can map the keys on your controller with just an edit of a particular file. Which file is it you ask? I can't quite remember but, it seems I seen it on the XBMC forums.
 Last Fall, I reviewed four different styles of coffee cups and decided that the diner style was the most likely to survive a fall off of a desk or counter. Now that I have one of these sweet cups as my very own, it is about time to test my theory.
Note: The opinion and research described here is my own and in no way represents the opinion of my employer. However, should any viewers choose to replicate my finding by purchasing a NaNoWriMo diner mug (or two), I'm fairly certain that my employer would be quite happy. So go buy one now.
32 ½ inches
 My counter, where I prepare coffee for the morn, is 32 and ½ inches from the floor. If I were to accidentally drop a coffee cup anywhere in my home, it would be from this counter.
So as not to harm any real coffee, a pot was brewed using previously used grounds. This faux coffee was poured into the cup and the cup was slowly pushed to the edge of the counter until the cup and it's contents tumbled to the linoleum.
Check out that sweet postcard on my fridge. The postcard was custom made by my friend in Switzerland; you are jealous.
The Aftermath
 There are a few things one should take note of:
- The coffee cup was unharmed
- my kitchen floor sure is dirty
- 7 fluid ounces of faux coffee can make a large mess
- it's a good thing I kept my mop at the ready
Well there you have it, the diner cup can easily survive a tumble off of my counter onto the kitchen floor. Whoa, hold on a second there tiger! Don't coffee cups do more than just fall off of the counter? Why yes, yes they do.
The Next Test
 Remember that time you left your coffee cup on the roof of your car, and the cup came smashing down as when you pulled out of your parking spot to go to work? It's never happened to me, but it could happen so I decided to test the cup this way.
Just a Little Dribble
 After backing up and slamming on the brakes nothing happened; the cup wouldn't budge. After two more attempts I had the same result: the cup didn't move, but a bit of "coffee" spilled out.
The base of the cup was quite grippy and wouldn't slide at all, so I did what any sane person would do to their favorite coffee cup... I got out of the car, and pushed the cup off of the roof.
Aftermath Part Deux
 Oh crap, there goes my favorite coffee cup.
Apparently, pushing a coffee cup off of the top of a car and letting it bounce over a 40 horsepower engine, will cause the cup to break when it finally stops on the hard unforgiving macadam.
Broken? I Think Not
 Broken cup? What broken cup? With my wide selection of adhesives to choose from, "broken" things rarely remain broken for very long.
A bit of jb-weld later and the cup was (mostly) as good as new!
Conclusion
There were a few things I learned while testing this cup:
- the cup has a nice grippy base
- I love this style of cup
- pushing a cup off of the top of a car and onto a very hard parking lot may in fact cause the cup to no longer be one piece, and will requires the use of an adhesive to make the cup whole again.
- my coffee tastes a bit off
Everything breaks. Now quit reading and find an object's breaking point. (or send me something to break) haha!
and doesn't jbweld have some kind of lead base? yum. :)
I've been looking for a new mug, might get one when I make some more cupboard space
Technically, I work for The Office of Letters and Light; the organizers of NaNoWriMo and Scriptfrenzy
1) Would fail to graduate and
2) Would be much worse for wear
but out society might be quite a bit better off!
 crackety snap! The grip shifter housing in my bicycle cracked and I was less than impressed. Oh well, salvation from my dilemma is only an adhesives drawer away. To be honest, I keep most of my adhesives in the same drawer that I keep my tools. Except, of course, for the random roll of duct-tape and an errant tube of epoxy .... and some solder.
 How oh how will I fix this damn thing?
It had dawned on me that since the housing was made of cheap plastic, it would be necessary to not just stick the pieces back together with some adhesive, but to also add some sort of structural support to keep the piece of crap from breaking again in the future. Standard epoxy would not be up to the task.
Thank you Caleb.
My late friend Caleb introduced me to JBweld in the mid-90s when I needed a way to fix a rather difficult problem: a cracked intake manifold on 68 Plymouth. Hot damn! JBweld is the stuff of legends. Caleb used to spin a yarn about repairing a cracked engine block with the gray goo of the gods. That sounds dirty.
 A squeeze of tube 1, a squeeze of tube 2, a little mixing with a toothpick, and I was glopping the glorious gunk on the cracked plastic. Enter the duct-tape. Nothing says "hold that crap in place while the JBweld dries" like duct-tape. There is always a chance that I used too much JBweld and the shifter will end up being stuck in one gear forever, but at least it won't break again.
- Tubular Music Thingy Part 2
- Beaglebone console output and a faster boot
- Tubular Music Thingy (part 1)
- get and speak the weather
- Getreel youtube-dl wrapper
- Two hours with the Archos 43
- HTML5 for a specific platform? I prefer to develop native apps
- a bit of dev talk about MuttonChop media player
- case for my status server
- my tiny todo list and some ruby
- The Camp Mug (almost) Test
- 2012 Tizen Developers Conference in San Francisco
- Freedom Jar is Full
- Web UI speed up using HTML5 Server Sent Events
- LEDs, BeagleBone, and my ToDo List
- a case for the BeagleBone
- fixing the car mirror
- Basic HTTP server in Vala using GIO Sockets
- sewing up a bling thing
- Trip to Austin
- convert hexadecimal string to an integer with Vala
- Training for 2012: Wuggling
- ABC tune grabber/converter
- A trip to Lancaster
- a new media playing machine
- Don't turn Tizen into WebOS
- making some chili sauce
- grumpy kid
- beer network improvement
- Ripping my DVD collection
- ruby script to search files in a directory for a string
- Pacific Pinball Museum Mission
- A Tale of Two Mugs
- shishi odoshi prototype
- file downloader in Node.js that handles redirects
- Travelling Far Part II
- python shell-fm web interface
- not quite a letter to cherrypal
- Audio playing class in Ruby with Gstreamer
- A quick fix
- my resized images using Ruby and Imagemagick
- one pound of coffee
- noise-canceling headphones that actually work
- updating my dynamic IP DNS information with Ruby
- Hello World in Ruby
- Bacon Apple Cider
- clawhammer sudo modprobe
- a web.py introduction
- The Skillet
- banjer strap on the cheap
- The Letter to Dell
- Linux Outlaws episode 170
- Not the 2010 Petaluma Whiskerino
- Monte Rio
- a new power switch
- the coffee cup review
- seriously, that thing is garbage
- keeping a GTK TextView cursor in view
- A tale of three sticker
- minimize/close to system tray in Python GTK
- A markdown editor/viewer in Python
- Red Phone Mumble Test
- Saturday Sassafrass
- A Friday Frolic
- Toshiba laptop review
- Google no longer uses Microsoft
- regarding Heybuddy and python stuff
- I'm calling you!
- heybuddy identi.ca client
- making a change holder thing
- Did I win? Yes and No.
- photograph sticker
- share this on facebook
- the damn computer died
- kilt alteration
- audcast streamer in vala with gstreamer, gtk and webkit
- The Mullet Adventure
- A Letter to the California State Legislature
- will dogfooding the frenzy leave me bitter?
- basic sitemap file maker in Python
- rock and rolling down the street
- Time to Celebrate
- game of life : Vala, SDL
- game of life : python, clutter
- networked timed text-to-speech goodness
- battery status in a screen session
- Bright Bike
- turning gears
- incremental screenshot namer wrapper
- a nice little feature/bug
- drawing circles
- broken VHS fixed
- cloudy phone number finder
- network quitter fixer
- the hot sauce experiment
- non-delivered emails sent to AOL domains
- GIMP mathmap experiment results
- tri-force tuna gift
- leave early, take your time, enjoy the solitude
- N37°49'8 W122°28'48
- rotary phone computer interface in action
- python script to play the latest version of an audio broadcast
- rotary phone computer input device
- server log spam from Microsoft?
- creating a CAPTCHA
- hello HTML 5! a simple audio player
- How does that increase security?
- getting familiar with GWT, a porting experiment.
- You're Not Carnival Personnel!
- "disable" a web app's buttons using javascript and css
- litterbugs and jaywalkers
- a basic web-app with pyjamas
- shell script to aid in compiling Vala projects
- Banjo part 4: she's finished
- Accent Characters in Linux with Xorg
- Terminal emulator part deux!
- Community
- Terminal Emulator in Vala using GTK and VTE
- Where is the MPAA on this one?
- pyclutter stage fullscreen hack
- Banjo part 3
- from necessity comes something
- If you build it, they will spam
- writing blogging software ( using data from blogspot )
- From WBEZ Chicago......
- Simple Switch Input to Enter a Command
- perplexing ponderence, pertaining penguin presents
- baby steps: the evolution my feature-free PHP framework
- ruining a perfectly good lamp?
- thank you bazaar
- quick not-so-little bikey bag
- Vala musings : int to string, packages, and starting with main
- my motor vehicle warranty is about to expire? really?
- Bike Trailer Part 2
- getting dandy with a hair pretty
- a not so elegant fixer up
- use python and gstreamer to get the tags of an audio file
- trials with gstreamer, pygst, and goom visualization
- Gaarrrrrrrrr!
- more pyclutter: get a move on - behaviourpath
- scrollwheel css div Internet Explorer 7 problem fixed
- Hello World using pyclutter - a half assed tutorial